Categories
Members STEM

Understanding Variables in Science


What Are Scientific Variables?
In science, variables are any factor that can be changed in an experiment to help us understand how different factors can affect an experiment or situation. Specifically, three different variables help us answer the question we are investigating. Identifying these variables before you start will guide your decisions about how to conduct your experiment and how to measure the results.

💡 We use variables when we apply the scientific method to our experiments.

Three Types of Variables

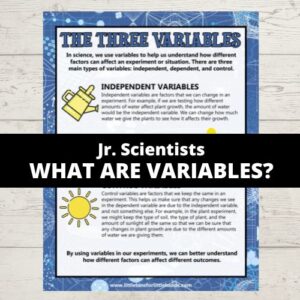
The three kinds of variables are independent, dependent, and controlled variables. You want to implement variables in any scientific investigation to ensure a fair test.

💡 Let’s use our Plant Growth Experiment as an example to understand the variables better.

Independent Variable

In a science experiment, the independent variable is the factor you will change. This variable affects the dependent variable. You can identify the independent variable by looking at what can exist in differing amounts or types and what is directly related to your experiment’s question. 👉 For example, if you are testing how different amounts of water affect plant growth, the amount of water would be the independent variable. You can change how much water you give the plants to see how it affects their growth.

💡 Remember, choose only one independent variable for your experiment!

Dependent Variable

The dependent variable is the factor that you observe or measure in an experiment. It is the variable that is affected by changes made to the independent variable. Note: the number of dependent variables can be more than one. 👉 The dependent variable would be the plant’s growth. We are measuring the plant’s growth to see how it is affected by the volume of water it is given.

Controlled Variables (Constant Variables)

Control variables are the factors that you keep the same in the science experiment. This helps ensure that any changes in the dependent variable are due to the independent variable and not something else. With some experiments, you may choose to set up a control that has no amount of the independent variable added to it. All other factors are the same. This is great for comparison. 👉 For example, in our plant growth experiment you would keep the type and amount of soil, including the type of fertilizer, the type of plant, and the amount of sunlight, all the same, so that you can be sure that any changes in plant growth are only due to the different amounts of water you give them. You could also have one plant that you give no water.

Grab the printable science project variables sheet!

Variables and Writing A Hypothesis
Choosing variables is essential for writing a good hypothesis because variables help you define what you are testing and observing in a science experiment. A hypothesis predicts how one variable (the independent variable) affects another (the dependent variable). It explains the relationship between the independent and dependent variables.

💡 Learn more about how to write a good hypothesis for kids.

Categories
Members STEM

Writing a Hypothesis With Kids

When you begin exploring a science topic, one of the first steps in the scientific method is making a hypothesis. But what exactly does that mean? Let’s break it down and learn how to write a simple hypothesis for kids. Use it in your next science experiment, and understand the key parts that make a hypothesis testable!

What Is a Hypothesis for Kids?

hypothesis is more than an educated guess about what will happen during an experiment. It’s your prediction based on the information you already know. A hypothesis is part of the scientific method, where you make a guess and then test that guess through experimentation.

Why Use the Scientific Method?

It is a process or method of research to help solve a problem. Try incorporating it into your next science experiment with the helpful examples below. The scientific method helps us:
  1. Stay Organized: It gives us clear steps to investigate one thing at a time.
  2. Make Better Predictions: It helps us think carefully about what might happen (make a hypothesis) before we begin testing.
  3. Learn from Mistakes: If our experiment doesn’t go as planned, we can understand why and try again.
  4. Find Real Answers: The scientific method is a reliable way to find answers to questions based on what we observe, not just what we think or feel.

💡 Read more about the Scientific Method [here] and Variables in Science [here].

What Are the Scientific Method Steps?

  1. Ask a Question Start by being curious! Ask, “What happens if I plant a seed in sand instead of soil?”
  2. Do Research Before jumping into an experiment, gather information. You can look in books, ask a teacher, or search the internet. Doing research helps you understand what others already know about your topic.
  3. Make a Hypothesishypothesis is not just an educated guess. It is an informed statement based on what you already know. After doing your research, you might predict, “I think the plant will not grow as well in sand as it does in soil.”
  4. Test the Hypothesis Now it’s time to experiment! Try planting seeds in both sand and soil and see what happens. This step lets you find out if your guess was right.
  5. Collect Data Write down what you observe. Maybe the plant in soil grows faster and taller than the one in sand. Keeping a journal or recording data helps you see patterns.
  6. Draw Conclusions Look at your results and decide if your hypothesis was correct. If it wasn’t, that’s okay! You’ve still learned something new.
  7. Share Results Scientists often share what they’ve learned with others. You might share your findings with your class or write a report. Keep a journal or notebook to refer back to for other experiments.

How Does Scientific Research Help?

Research is an important part of the scientific method because it helps us:
  • Build on What We Know: We can learn from what others have already discovered before experimenting.
  • Make Better Hypotheses: When we research, we make more informed predictions about what might happen during the experiment. We don’t just guess!

Why Should We Use the Scientific Method?

The scientific method isn’t just for scientists—it’s for anyone who wants to solve problems, answer questions, and learn about the world. By following these steps, we can:
  • Think critically about what we’re investigating.
  • Test our ideas in a fair and organized way.
  • Learn from our experiments and improve our understanding.

💡 The scientific method teaches us that even if our hypothesis is wrong, that’s still valuable! Every experiment is a chance to learn something new, making science fun and exciting for all ages.

How to Write a Simple Hypothesis for Kids

You can follow this easy format to write a simple hypothesis with kids:

💡 “If [I change this], then [this will happen].”

For example:
  • If I add more water to the plant, then it will grow taller.
  • If I heat the water, then the candy will dissolve faster.
When you make a hypothesis, you need to consider the variables in your experiment. A variable is anything that can change in the experiment. There are different types of variables to consider:
  • Independent Variable – This is the part of the experiment you change on purpose. For example, the amount of water you give a plant.
  • Dependent Variable – This is the result you measure in response to the independent variable. For example, how tall the plant grows.
Add this helpful science information pack to your next science experiment!

Hypothesis for Kids Examples

Here are some examples of hypotheses that are grade-level appropriate:
  • Elementary school: “If I use warm water, then sugar will dissolve faster than in cold water.”
  • Middle school: “If I increase the density of the liquid, then the object will float higher.”

💡By focusing on the independent and dependent variables, you’ll create a clear and testable hypothesis.

Using a Hypothesis with Young Kids

You can introduce the idea of hypotheses to young kids and even preschoolers! While the concept needs to be simplified, young children are naturally curious and already make guesses about how things work in their everyday play. By guiding them to think of these guesses as predictions they can test, you can start teaching them the basics of a hypothesis.

How to Introduce Hypotheses to Preschoolers

For young children, using language they understand is key. Instead of saying “hypothesis,” you might say:
  • “What do you think will happen?”
  • “Let’s make a prediction.”

Simple Steps to Writing a Hypothesis with Preschoolers

  1. Start with a question: Ask them something simple and observable, like “What do you think will happen if we add water to the sand?”
  2. Make a prediction: Encourage them to say what they think will happen. For example, “I think the sand will get wet and sticky.”
  3. Test it: Let them try the simple science experiment to see if their prediction was right.
Download these pages here.

Simple Science Experiments for Hypotheses

Here are some great science projects where you can practice writing a hypothesis and testing it through experimentation:
Plant Growth Experiment: Observe how different amounts of light affect plant growth. You might write a hypothesis like: “If I put the plant in more sunlight, then it will grow faster.”
Paper Towel Absorbency Test: Compare different brands of paper towels to see which absorbs more water. A hypothesis example could be: “If I use Brand X, then it will absorb more water than Brand Y.”
Floating and Sinking with Density: Test how different liquids (like water and oil) affect the ability of objects to float. Write a hypothesis such as: “If I place the object in oil, then it will float higher than in water due to the difference in density.”

Categories
Members STEM

Scientific Method For Kids

The scientific method is foundational to understanding the world and solving problems through experimentation and observation.

Scientific Process

Whether you teach elementary or middle school, introducing the steps of the scientific method can spark curiosity, develop critical thinking, and build a lifelong love for science. Below, we’ll explain:
  • What the scientific method is
  • How to teach the scientific method to kids
  • Fun, easy experiments for students to explore each step of the process.
Let’s make science engaging and accessible for all ages!

Note: The use of the Best Science Practices is also relevant to the topic of using the scientific method. Read more here and see if it fits your science planning needs.

What Is the Scientific Method?

The scientific method is a logical process for asking questions, testing ideas, and drawing conclusions. Scientists, including famous figures like Galileo GalileiIsaac Newton, and Charles Darwin, have used this method to make groundbreaking discoveries in physicsbiology, and chemistry. The scientific method involves:
  1. Making observations about a phenomenon.
  2. Asking a question.
  3. Forming a hypothesis (a possible explanation or prediction).
  4. Conducting an experiment to test the hypothesis.
  5. Recording results and drawing conclusions.
  6. Communicating findings.
Young learners can grasp these concepts by simplifying each step with real-world examples and fun activities. Teachers can adapt the method to different ages and subjects, including social sciences, economics, and environmental studies.

Key Steps of the Scientific Method

Here’s a breakdown of the steps of the scientific method, complete with classroom-friendly examples and tips:

Step 1: Make Observations

Encourage students to use their senses to observe the world. Observations may include what they see, hear, or feel.
  • Example: “What happens to an ice cube when left in the sun?”
Teaching Tip: Introduce tools like magnifying glasses, thermometers, and measuring cups to enhance their observations.

Step 2: Ask a Question

Ask questions that build on student observations.
  • Example: “Does ice melt faster in saltwater or freshwater?”
Teaching Tip: Guide students to form specific questions. Use prompts like, “What do you want to learn?” or “What would happen if…?”

Step 3: Form a Hypothesis

Explain that a hypothesis is not just a guess but a prediction based on background research and observations.
  • Example: “I think ice will melt faster in saltwater because salt lowers the freezing point of water.”
Use background research tools like books, articles, or videos to help students understand concepts. Teaching Tip: Remind students that their hypothesis doesn’t need to be correct—science is about learning from results!

💡 Learn more about how to form a hypothesis for kids [here].

Step 4: Conduct an Experiment

Design experiments that change one independent variable at a time while keeping controlled variables constant. Measure the impact on the dependent variable.
  • Example: Testing ice melting times in different liquids.
    • Independent Variable: Type of liquid (water, juice, saltwater).
    • Dependent Variable: Time taken for the ice to melt.
    • Controlled Variables: Liquid temperature, ice cube size, and container size.
Teaching Tip: Discuss the importance of reproducibility in science—conduct experiments multiple times for accuracy.

💡 Learn more about dependent and controlled variables [here].

Step 5: Record Results and Draw Conclusions

Teach students to observe and document data carefully.
  • Record results in journals using charts, graphs, or drawings.
  • Example: The ice in saltwater melted faster than the ice in freshwater.
Encourage reflection:
  • Was their hypothesis supported?
  • What did they learn?
Teaching Tip: Use tools like printable worksheets for easy data recording.

Step 6: Communicate Results

Have students share their findings through:
  • Presentations
  • Posters
  • Simple scientific journal entries
Teaching Tip: Celebrate student work! Discuss how communication helps scientists learn from each other and build on discoveries.

💡Learn how to make a science fair board with free printables.

Fun Scientific Experiments

Here are easy, hands-on experiments to reinforce each scientific method step. These are perfect for elementary and middle school classrooms.

1. Sink or Float Experiment

Explore predictive power and buoyancy:
  • Materials: Various objects, a tub of water.
  • Question: “Will this object sink or float?”

2. Apple Browning Experiment

Teach students about oxidation and variables:
  • Question: “Which substance prevents apples from turning brown?”
  • Variables: Lemon juice, water, vinegar, and oil.

3. Magic Milk Experiment

Investigate surface tension and relativity:
  • Materials: Milk, dish soap, and food coloring.
  • Question: “How does soap affect food coloring in milk?”

4. Paper Towel Absorbency Test

Introduce hypothesis testing and data collection:
  • Question: “Which brand of paper towel absorbs the most water?”
  • Measure water absorbed to determine the best paper towel.

5. Freezing Water with Salt

Explore temperature regulation:
  • Question: “How does salt affect the freezing point of water?”
  • Compare results with and without salt.

6. Catapult Experiment

Introduce engineering principles:
  • Build a simple catapult with popsicle sticks.
  • Question: “How does changing the angle affect the distance?”

7. Viscosity of Liquids

Teach about fluid properties:
  • Materials: Honey, oil, water, and marbles.
  • Question: “Which liquid allows a marble to fall the fastest?”

8. What Colors Absorb Heat?

Explore how color impacts heat absorption:
  • Materials: Different colored paper, a lamp, and thermometers.
  • Question: “Do darker colors absorb more heat than lighter colors?”
  • Compare temperature changes on papers exposed to light.

9. Newton’s Laws in Action

Demonstrate Newton’s Laws of Motion:
  • Experiment: Build a simple balloon rocket.
    • Question: “How does force and mass impact the distance traveled?”
  • Discuss action-reaction forces, acceleration, and motion.

10. Balloon Inflation with Baking Soda and Vinegar

Teach about chemical reactions and gas production:
  • Materials: Balloon, baking soda, vinegar, and a bottle.
  • Question: “How much gas is produced when mixing baking soda and vinegar?”
  • Observe the balloon inflating as carbon dioxide gas forms.

11. Plant Growth Experiment

Investigate the factors that affect plant growth:
  • Materials: Seeds, soil, pots, water, and light sources.
  • Question: “How does the amount of sunlight affect plant growth?”
  • Variables: Test plants with varying amounts of sunlight (full sun, partial shade, no sunlight).

Why Teach the Scientific Method?

The scientific method empowers students to think like scientists and apply problem-solving skills in real-world situations. It nurtures:
  • Logical thinking
  • Deduction and reasoning
  • Reproducibility in experiments
Teaching the scientific method aligns with Next Generation Science Standards (NGSS) and encourages inquiry-based learning, which fosters scientific curiosity and critical thinking.
Categories
Members

Winter Food Chain Activities

Winter Food Chain

Winter transforms ecosystems into challenging environments where energy becomes a precious resource. From snowy forests to the icy Arctic tundra, plants, herbivores, carnivores, omnivores, and decomposers must work together to ensure survival.

Recommended Grade Level: 3rd–6th-grade science lessons.

  • Prey: Animals hunted by predators.
  • Trophic Level: Each step in the energy flow of a food chain.
  • Cycles of Matter: Movement of nutrients through living and non-living parts of an ecosystem.

Winter Food Chains and Energy Flow

How Do Winter Ecosystems Work?

Winter brings shorter days, colder temperatures, and snow-covered landscapes. These changes impact all organisms:
  • Dormancy: Plants conserve energy by stopping growth.
  • Herbivores Adapt: Herbivores like rabbits and mice switch to eating bark, twigs, and seeds.
  • Carnivores Adapt: Foxes and hawks hunt smaller prey.
  • Hibernation: Some animals, like bears and snakes, hibernate to conserve energy.

Winter Food Chain Example:

🌞 Sun → Tree (Producer) → Rabbit (Primary Consumer) → Fox (Secondary Consumer) → Hawk (Top Predator) Energy Transfer Insight: Only 10% of energy moves from one trophic level to the next. The rest is used for survival or lost as heat. Fun Fact: Squirrels and chipmunks store energy-rich food, like seeds and nuts, to prepare for the cold months.

Free Winter Food Chain Printable

Arctic Food Chains and Food Webs

In the Arctic tundra:
  • Producers: Moss, algae, and lichen.
  • Primary Consumers: Lemmings, caribou, and insects.
  • Secondary Consumers: Arctic foxes and snowy owls.
  • Top Predators: Polar bears and hawks.
Example Food Chain: 🌞 Sun → Algae → Lemming → Arctic Fox → Polar Bear

Arctic Marine Food Chain

In Arctic waters:
  • Producers: Phytoplankton.
  • Primary Consumers: Zooplankton and krill.
  • Secondary Consumers: Fish like cod.
  • Tertiary Consumers: Seals.
  • Top Predators: Whales and polar bears.
Example Food Chain: 🌞 Sun → Phytoplankton → Krill → Cod → Seal → Polar Bear

Arctic Food Web Diagram Example:

food web diagram shows how Arctic animals interact across multiple trophic levels. Fun Fact: Seals rely on thick blubber for energy reserves during harsh Arctic winters. Discussion Question: What happens if one part of the Arctic food web breaks down?

Comparing Winter and Arctic Food Webs

Winter Ecosystem Arctic Ecosystem
Seasonal energy scarcity Year-round energy scarcity
Deciduous trees lose leaves Low-growing mosses and lichens dominate
Herbivores store food or hibernate Herbivores stay active year-round
Carnivores adapt their diet Top predators rely heavily on seals and fish
Key Takeaway: Both systems rely on efficient energy transfer and adaptations for survival.

Decomposers and Nutrients

Decomposers like bacteria and fungi break down dead matter, returning nutrients to the soil and water. This keeps the cycles of matter moving and supports producers like plants and algae. Key Insight: Without decomposers, ecosystems would run out of essential nutrients! Example: A dead fish breaks down, nourishing algae and phytoplankton, continuing the cycle.

Hands-On Winter Food Chain Activities for Classrooms

  1. Winter Food Chain Craft: Draw and label a winter food chain showing the flow of energy.
  2. Arctic Food Web Puzzle: Arrange Arctic animals into a food web diagram.
  3. Ecosystem Diorama: Build a mini winter or Arctic ecosystem showing energy transfer.
  4. Design a Food Chain Challenge: Have students design their own food chain with animals of their choice.
Extension Idea: Research how spidersfrogs, or insects fit into different ecosystems.

Arctic Lesson Pack

Want to explore winter and Arctic ecosystems more? Check out our 75-page Arctic Unit! Includes an Arctic Food Chain printable and animal adaptations, plants, seasons, survival, and more!

What Are Food Chains and Food Webs?

food chain is a linear representation showing the flow of energy from producers (plants) to primary consumers (herbivores), then to secondary consumers (carnivores or omnivores), and finally to top predators. A food web, on the other hand, is a complex network of interconnected food chains showing how different organisms depend on each other in an ecosystem.

Energy Transfer in Winter Food Chains and Webs

  • Producers (Plants & Phytoplankton): Use photosynthesis to convert sunlight into energy.
  • Primary Consumers (Herbivores & Zooplankton): Eat plants or algae to gain energy.
  • Secondary Consumers (Carnivores like foxes and omnivores like ducks): Eat herbivores.
  • Top Predators (Polar Bears, Owls, Hawks): Eat smaller predators and herbivores.
  • Decomposers (Bacteria): Break down dead plants and animals, returning nutrients to the soil or water.
Key Vocabulary to Explore:
  • Prey: Animals hunted by predators.
  • Trophic Level: Each step in the energy flow of a food chain.
  • Cycles of Matter: Movement of nutrients through living and non-living parts of an ecosystem.

Winter Food Chains and Energy Flow

How Do Winter Ecosystems Work?

Winter brings shorter days, colder temperatures, and snow-covered landscapes. These changes impact all organisms:
  • Dormancy: Plants conserve energy by stopping growth.
  • Herbivores Adapt: Herbivores like rabbits and mice switch to eating bark, twigs, and seeds.
  • Carnivores Adapt: Foxes and hawks hunt smaller prey.
  • Hibernation: Some animals, like bears and snakes, hibernate to conserve energy.

Winter Food Chain Example:

🌞 Sun → Tree (Producer) → Rabbit (Primary Consumer) → Fox (Secondary Consumer) → Hawk (Top Predator) Energy Transfer Insight: Only 10% of energy moves from one trophic level to the next. The rest is used for survival or lost as heat. Fun Fact: Squirrels and chipmunks store energy-rich food, like seeds and nuts, to prepare for the cold months.

Free Winter Food Chain Printable

Arctic Food Chains and Food Webs

In the Arctic tundra:
  • Producers: Moss, algae, and lichen.
  • Primary Consumers: Lemmings, caribou, and insects.
  • Secondary Consumers: Arctic foxes and snowy owls.
  • Top Predators: Polar bears and hawks.
Example Food Chain: 🌞 Sun → Algae → Lemming → Arctic Fox → Polar Bear

Arctic Marine Food Chain

In Arctic waters:
  • Producers: Phytoplankton.
  • Primary Consumers: Zooplankton and krill.
  • Secondary Consumers: Fish like cod.
  • Tertiary Consumers: Seals.
  • Top Predators: Whales and polar bears.
Example Food Chain: 🌞 Sun → Phytoplankton → Krill → Cod → Seal → Polar Bear

Arctic Food Web Diagram Example:

food web diagram shows how Arctic animals interact across multiple trophic levels. Fun Fact: Seals rely on thick blubber for energy reserves during harsh Arctic winters. Discussion Question: What happens if one part of the Arctic food web breaks down?

Comparing Winter and Arctic Food Webs

Winter Ecosystem Arctic Ecosystem
Seasonal energy scarcity Year-round energy scarcity
Deciduous trees lose leaves Low-growing mosses and lichens dominate
Herbivores store food or hibernate Herbivores stay active year-round
Carnivores adapt their diet Top predators rely heavily on seals and fish
Key Takeaway: Both systems rely on efficient energy transfer and adaptations for survival.

Decomposers and Nutrients

Decomposers like bacteria and fungi break down dead matter, returning nutrients to the soil and water. This keeps the cycles of matter moving and supports producers like plants and algae. Key Insight: Without decomposers, ecosystems would run out of essential nutrients! Example: A dead fish breaks down, nourishing algae and phytoplankton, continuing the cycle.

Hands-On Winter Food Chain Activities for Classrooms

  1. Winter Food Chain Craft: Draw and label a winter food chain showing the flow of energy.
  2. Arctic Food Web Puzzle: Arrange Arctic animals into a food web diagram.
  3. Ecosystem Diorama: Build a mini winter or Arctic ecosystem showing energy transfer.
  4. Design a Food Chain Challenge: Have students design their own food chain with animals of their choice.
Extension Idea: Research how spidersfrogs, or insects fit into different ecosystems.

Arctic Lesson Pack

Want to explore winter and Arctic ecosystems more? Check out our 75-page Arctic Unit! Includes an Arctic Food Chain printable and animal adaptations, plants, seasons, survival, and more!